Breadcrumb
- Home
- Labs
- Advanced Labs
- SIMBAD Astronomical Database
- Part 2: Operations with SIMBAD
Part 2: Operations with SIMBAD
Resources: SIMBAD
The first step to using SIMBAD is to bring it up on a web browser by going to the link above. On the left under 'Queries' click 'basic search'. You will then see a screen like that shown below. Type in the name of an object in the 'basic query :' blank and then click 'SIMBAD search'.

Object Information and Data
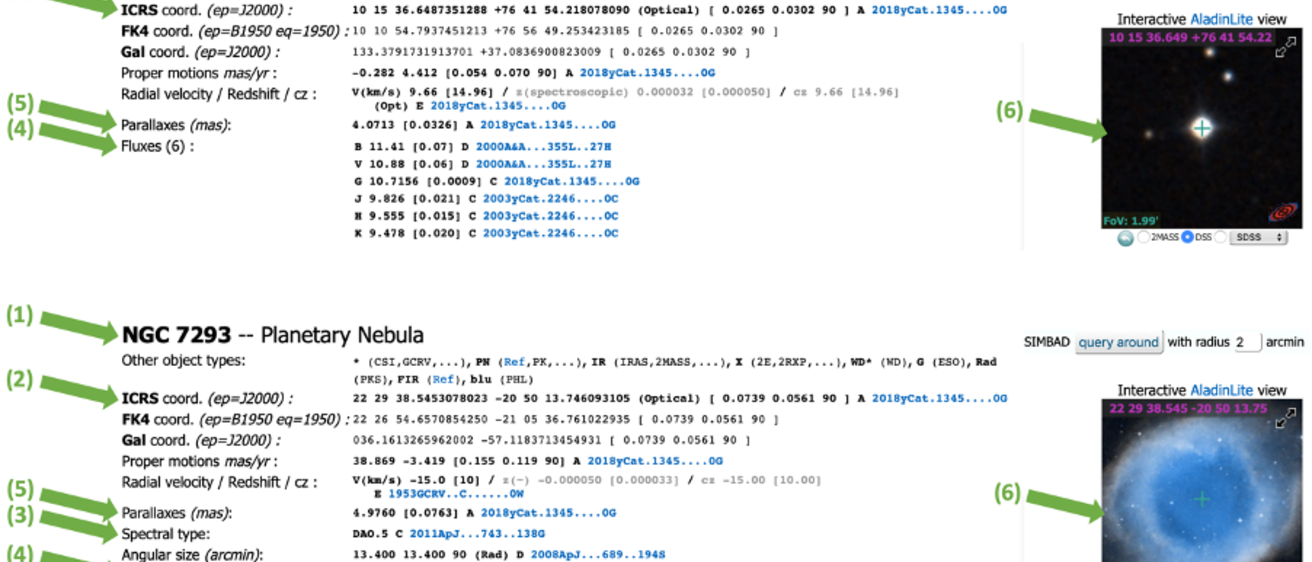
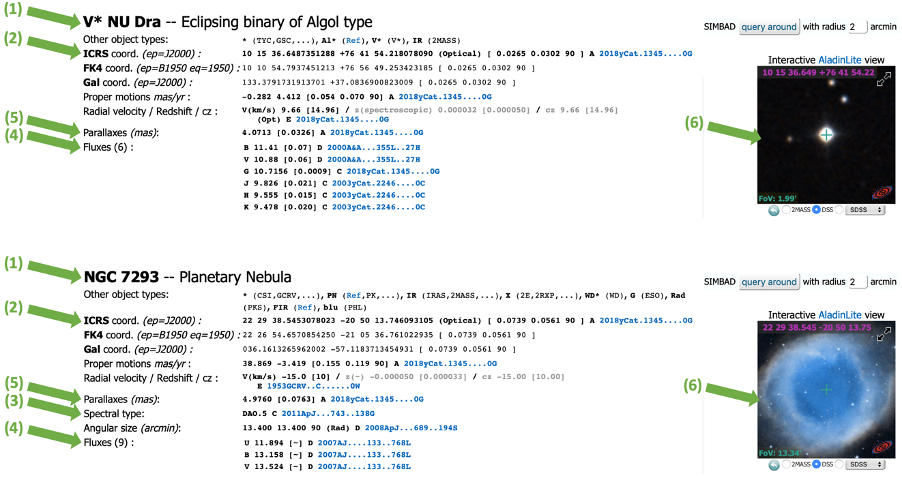
When you click the button, the next page you are brought to will give you the information and data on the object. (Sometimes after you’ve searched for an object a different name will be shown on the next screen. That’s usually ok; some objects just have multiple names, such as both a Messier name and an NGC name. Google both names along with the words “image of astronomical object” to convince yourself it’s the same object if you need to.) Two examples of such next pages are given in the images below, along with notes/narrative for interpreting and using some of the information given. Note that depending on the object you’ve selected, not all the information may be relevant, or known, and so not all the information in the images below may be included on the SIMBAD page for your object(s).

[1] The name of the object and a brief description of the object or what it is
[2] The celestial coordinates of the object to the highest available precision (right ascension and declination)
[3] The spectral type, or the classification based on the object’s observed spectrum, may be given. If the object is a star and so a stellar spectral class is given, you can tell how similar a star is to the Sun (e.g. is it spectral class G2V or M3I).
[4] The brightness of the object at different wavelengths (the apparent magnitude in different colors for visual observations). For stars, the fluxes will be the apparent magnitudes in different colors. Visual red apparent magnitudes are generally denoted by R, visual green apparent magnitudes are generally denoted by V, visual blue apparent magnitudes are generally denoted by B, etc.
[5] Given parallaxes (aritificial observed motion due to Earth's orbit around the Sun), below denoted by p, which allow you to calculate the distances to stars (and other non-stellar objects, when given) using the formula:

Be careful to note that the parallaxes given by SIMBAD are in milliarcseconds (0.001 arcseconds, mas) rather than in arcseconds as given in the formula above. To deal with this, take the SIMBAD parallax and multiply it by 0.001 to convert it to a parallax in arcseconds before entering it in the formula above. For example, for the parallax value from the image of the first page above, the page for V* NU Dra:

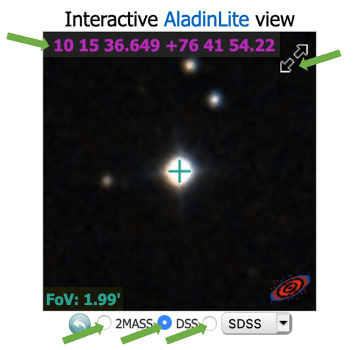
[6] To the right side of the screen that appears when you do basic query, there is an image window. A view of one of these windows is shown below. This image window shows the image of the object you have selected, in this case a star. Notice that the window shows the celestial coordinates at the top. If you move your mouse around the window, it displays the coordinates of the mouse in gray. If you remove your mouse from the window, it displays the coordinates of the center of the field of view in purple.
There are two important controls in this image window. First, the clickable buttons at the bottom allow you to select the survey you are viewing. In the case shown, the DSS image is selected and displayed. If you wanted to switch to SDSS or 2MASS (remember that the SDSS image data may not be available for all fields), you would select the SDSS or 2MASS buttons. Second, the arrows in the upper right-hand corner expand the image to full-screen mode. Converting to full-screen mode will then really give you a sense of the power of the data you are dealing with. You should expand to full-screen mode for the object(s) you are studying.

Full-Screen Mode
Once you have activated full-screen mode, there are a couple of important features available to you. First, you can and should expand and shrink the field to see how much detail you can see, or how big the object is. The expanding and shrinking options depend on the computer you are using. For a computer with a mouse with a wheel on top in between the left and right click buttons, rotating the wheel will do it. For other mice or a touch pad, scrolling up or down (as if you’re going to the top or bottom of a webpage) should do it, or using a “finger squeeze” or “finger expansion” motion on the touchpad may work. (If while expanding and shrinking you seem to have lost the image of your object, refresh the page (jumping out of full screen mode and re-entering it if you need to).) Second, as you move the cursor around in the expanded image, the upper left corner of the window will give you the coordinates of the cursor location in gray. This can help you find the position of an object of interest that you notice in the field.
Another useful application of the cursor coordinate read is that you can measure the angular diameter of the object you are viewing. The easiest way is to measure a diameter is by using the declination coordinate. Move the cursor to the top of your object (keeping in mind that the edges of astronomical objects are sometimes somewhat arbitrary), and note the declination of that point (left image example below). Then move the cursor to the bottom of the object and record the declination at that point (right image example below). The angular diameter (in a north-south direction) is the difference in the declinations at top and bottom. Remember that declination is given in degrees, arcminutes, and arcseconds (top left corner of both image examples below, with zoom/added breakdown in green). Give your answer in the units that express the diameter most conveniently.

An example of using full-screen mode to measure the angular diameter of an astronomical object. Shown here, the Helix Nebula has a declination at its top of about 57.5 arcminutes. The declination at the bottom of the object is about 44 arcminutes. The angular diameter (in a north-south direction) is the difference in the declinations of top and bottom, so the angular diameter of the Helix Nebula is about 57.5 arcminutes - 44 arcminutes = 13.5 arcminutes.